AIPickr
AI can cut the time it takes to write a good blog post roughly in half. It can also produce forgettable posts that never rank. The difference is which steps you hand over and which you keep.
This guide splits the work into eight steps. AI does the heavy lifting on structure and drafting; you supply the angle, the experience and the fact-check.
What you need: an AI assistant (Claude, ChatGPT or Gemini; the free plans work), a document editor, and about two to three hours. A grammar tool like Grammarly helps in step 7.
Step 1: Pick one reader question
Every post should answer one question for one reader. “AI tools” is a topic; “which AI writing tool should a solo blogger pay for?” is a question.
Write down three things before you open any AI tool:
- The query: the exact phrase someone would search.
- The reader: who they are and what they already know.
- The outcome: what they should be able to do after reading.
AI is useful here as a brainstorm partner, not a decider. Ask it for related questions, then pick the one you can answer better than anyone.
I write a blog for [audience]. List 15 specific questions they search for
about [topic]. For each, say what the searcher wants to do next.
Step 2: Collect your own material
This is the step most AI-written posts skip, and why they all sound the same. Before drafting, gather what only you have.
- Notes from actually doing the thing.
- Screenshots, numbers, before-and-after results.
- Opinions: what you’d recommend, and what you’d avoid.
- Two or three trustworthy sources for facts you’ll cite.
Paste it all into one document. In Claude you can add it to a Project; in ChatGPT, a custom GPT or project.
Step 3: Build the outline with AI
Now let AI do what it’s good at: structure. Give it your question, reader and notes, and ask for an outline.
Using only the notes below, create an outline for a blog post that answers:
"[question]". Reader: [reader]. Put the direct answer in the first two
sentences. Use H2s for main sections and keep it to 6-8 sections.

NOTES:
[paste notes]
Then edit the outline yourself. Cut sections that don’t serve the question, and move the most useful one up. The outline is where your judgment matters most.
Step 4: Draft one section at a time
Drafting the whole post in one prompt gives you a smooth, generic result. Drafting section by section keeps each part tied to your notes.
Write the section "[H2 title]" in about [150-250] words.
Use the facts and examples from my notes only. Short paragraphs
(max 3 sentences). Plain US English. No intro phrases like "In today's world".
Paste each section into your document as you go. If a section comes back vague, the fix is usually better notes, not a better prompt.
Step 5: Add experience and examples
Read the draft and mark every sentence that could appear on anyone’s blog. Replace those with something specific: a number you measured, a mistake you made, a screenshot.
This is what separates a post that ranks from one that doesn’t. Google’s guidance asks whether content shows first-hand experience, and readers notice it too.
In our test, we asked ChatGPT (Free) for a 300–350-word section titled “What to check before you pay for an AI writing tool.” It came back at about 384 words and opened with a generic line (“Choosing an AI writing tool can be difficult…”), exactly the kind of sentence this step tells you to replace. It did keep our [PRICE] placeholder instead of inventing a price. Tested on the Free plan; paid plans may perform differently.
Step 6: Fact-check every claim
AI tools can state wrong facts with total confidence. Treat every number, price, date, quote and feature claim as unverified until you’ve opened its source.
- Prices and plans: check the vendor’s official pricing page and note the month.
- Statistics: find the original study, not a blog quoting it.
- Quotes: confirm the person actually said it.
Anything you can’t confirm, cut or rewrite as an opinion. On this site we mark unconfirmed items until they’re checked; see our How We Test page.
Step 7: Edit for voice and clarity
Now make it sound like you. Read it aloud and fix anything you wouldn’t say.
Edit this section for clarity. Keep my meaning and examples. Remove filler
and repeated points, keep paragraphs to 3 sentences, and flag any claim
that needs a source. Don't add new facts.
Finish with a grammar pass. Grammarly’s free plan is enough for most posts; our AI writing tools for bloggers comparison covers when Pro is worth it.
Step 8: Optimize and publish
Before you publish, run through this checklist:
- Title includes the main query and stays under about 60 characters.
- Meta description says what the reader gets, in about 150 characters.
- First two sentences answer the question directly.
- Headings read like a summary of the post.
- Three or more internal links to related posts on your site.
- Images have descriptive alt text. Need visuals? See our AI image generator comparison.
- Date shows when the post was published and last updated.
Then publish, and set a reminder to recheck facts in three months.
A worked example
Here’s how the eight steps look for a real post. Say the query is “best AI writing tool for a solo blogger.”
- Question: a part-time blogger wants to know which single tool to pay for this month.
- Material: your notes from trying two free plans, the official price pages, and one frustration you hit.
- Outline: AI proposes ten sections; you keep six and move “our pick” to the top.
- Draft: each section gets 150–250 words from your notes.
- Experience: you replace “it’s easy to use” with how long setup actually took.
- Fact-check: you open each pricing page and write the month you checked it.
- Edit: you cut a repeated paragraph and split two long ones.
- Publish: title, meta description, three internal links, and today’s date.
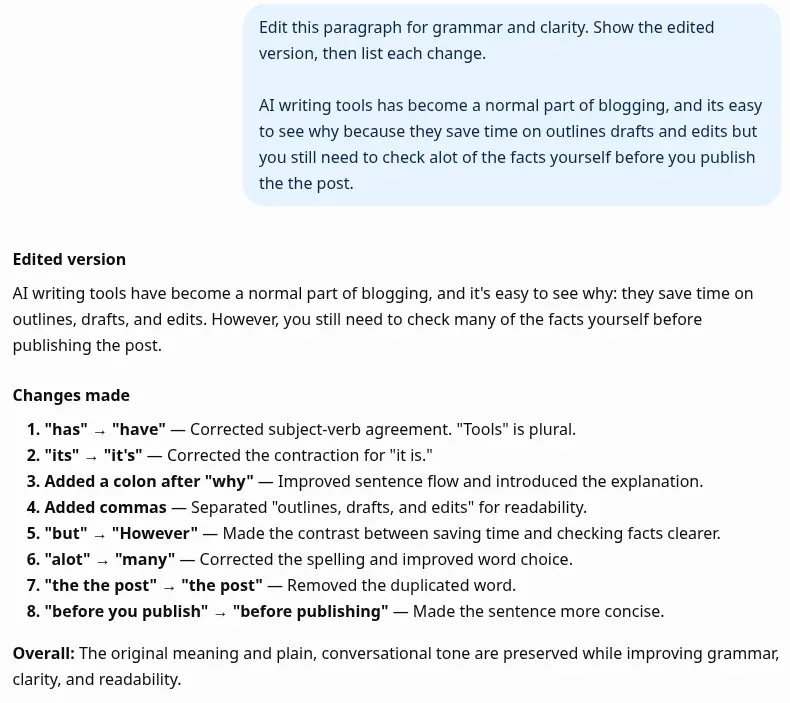
In our test, the edit fixed all five planted errors, but the change list missed one edit it made (it silently removed “because”), so compare the before and after yourself instead of trusting the list.
Common mistakes to avoid
- Prompting for the whole post at once. You get a smooth, generic article with no point of view.
- Skipping your own material. Without notes, AI fills gaps with filler or invented details.
- Trusting numbers. Every price, stat and date needs a source you opened yourself.
- Publishing the first draft. The edit is where the post starts to sound like a person wrote it.
- Forgetting updates. AI tools and prices change fast, so old posts go stale quickly.
Which steps to give AI, and which to keep
| Step | AI does | You do |
|---|---|---|
| 1. Question | Brainstorm options | Choose one |
| 2. Material | — | All of it |
| 3. Outline | First version | Cut and reorder |
| 4. Draft | First draft per section | Supply notes |
| 5. Experience | — | All of it |
| 6. Fact-check | Flag claims | Verify sources |
| 7. Edit | Tighten wording | Final read-aloud |
| 8. Publish | Suggest titles and meta | Final choice |
Tools for each step
You can do all of this with one assistant. If you’re deciding which one, start with our ChatGPT vs Claude vs Gemini comparison.
- Drafting: Claude Pro ($20/mo, or $17/mo yearly) or ChatGPT Plus ($20/mo). Last checked: 2026-11.
- Editing: Grammarly Free or Pro.
- SEO (later): Surfer, once you have posts worth optimizing.
Keep going: related comparisons
- Best AI writing tools for bloggers — which drafting and editing tool to pay for.
- ChatGPT vs Claude vs Gemini — choosing your main AI assistant.
- Best AI image generators — featured images and graphics for your posts.